Note
Access to this page requires authorization. You can try signing in or changing directories.
Access to this page requires authorization. You can try changing directories.
Integrate Event Hubs with Azure Virtual Network service endpoints to restrict access to your Event Hubs namespace from specific virtual network subnets. This article explains how virtual network integration works and provides step-by-step instructions to configure it.
Overview
By using Virtual Network service endpoints, workloads running in a virtual network, such as virtual machines, can securely access your Event Hubs namespace. The network traffic path is secured on both ends.
When you configure an Event Hubs namespace with at least one virtual network service endpoint, the namespace only accepts traffic from authorized subnets. From the virtual network perspective, the service endpoint creates an isolated networking tunnel from the subnet to the Event Hubs namespace.
This configuration establishes a private and isolated connection between workloads in the subnet and your Event Hubs namespace, even though the Event Hubs service endpoint uses a public IP address.
Important points
- This feature isn't supported in the basic tier.
- When you enable virtual networks for your Event Hubs namespace, incoming requests are blocked by default unless they originate from a service operating from allowed virtual networks. Blocked requests include the requests from other Azure services, the Azure portal, logging and metrics services, and so on. As an exception, you can allow access to Event Hubs resources from certain trusted services even when virtual networks are enabled. For a list of trusted services, see Trusted services.
- Specify at least one IP rule or virtual network rule for the namespace to allow traffic only from the specified IP addresses or subnet of a virtual network. If you don't specify any IP and virtual network rules, the namespace is accessible over the public internet (using the access key).
Advanced security scenarios enabled by virtual network integration
Virtual network integration supports scenarios that require strict security isolation while still allowing communication between compartmentalized services.
Direct IP routes between network compartments, even those using HTTPS over TCP/IP, are vulnerable to network-layer exploits. Event Hubs provides a more secure alternative by acting as an intermediary. Workloads in separate virtual networks that connect to the same Event Hubs instance can exchange messages reliably while maintaining network isolation.
This approach gives security-sensitive solutions access to Azure's scalable messaging capabilities while creating communication paths that are more secure than direct peer-to-peer connections.
Bind Event Hubs to virtual networks
Virtual network rules control whether your Event Hubs namespace accepts connections from a specific virtual network subnet.
To bind an Event Hubs namespace to a virtual network:
- Create a service endpoint on a virtual network subnet and enable it for Microsoft.EventHub. For more information, see Virtual network service endpoints.
- Add a virtual network rule to bind the Event Hubs namespace to the service endpoint.
The virtual network rule creates an association between the Event Hubs namespace and the virtual network subnet. All workloads in the subnet can access the Event Hubs namespace while the rule exists.
Note
Event Hubs doesn't establish outbound connections to your subnet. The rule only grants inbound access from the subnet to Event Hubs.
Use Azure portal
When creating a namespace, you can choose between:
- Public access: Allows access from all networks.
- Private access: Restricts access to private endpoints only.
After creating the namespace, you can further refine access by specifying IP addresses or virtual networks or network security perimeters.
Configure public access when creating a namespace
To enable public access, select Public access on the Networking page of the namespace creation wizard.

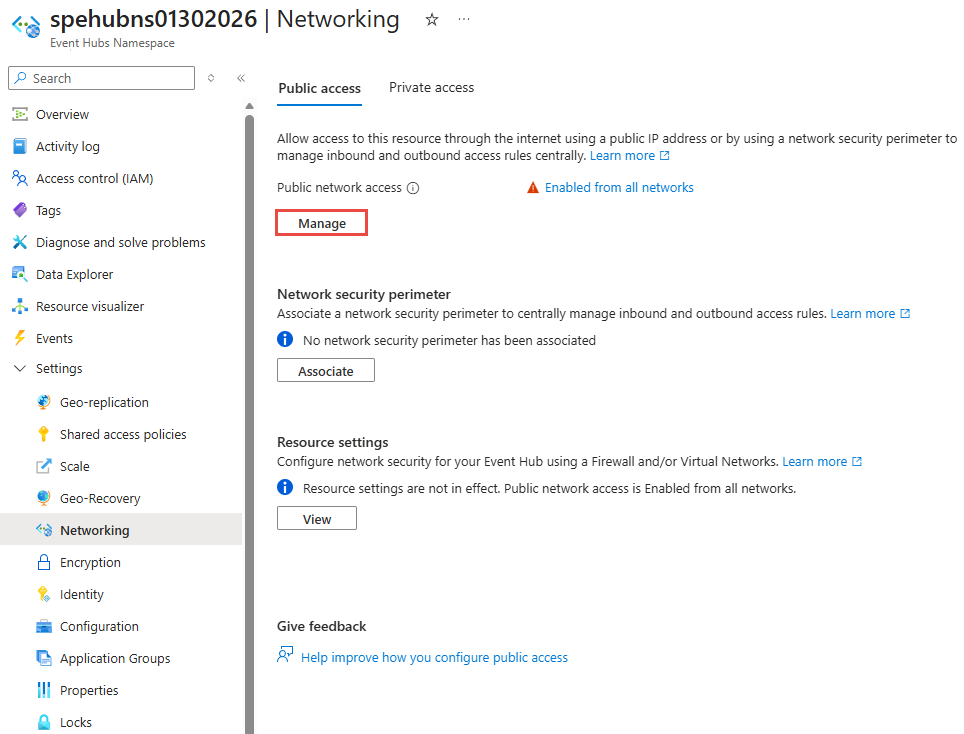
After you create the namespace, select Networking in the left menu of the Event Hubs Namespace page.
By default, Public network access is enabled for the namespace for all networks.

This option enables public access from all networks by using an access key. The namespace accepts connections from any IP address (using the access key).
The next section provides you details on configuring virtual network service endpoints to specify the virtual networks from which the access is allowed.
Configure selected networks for an existing namespace
This section shows you how to use Azure portal to add a virtual network service endpoint. To limit access, integrate the virtual network service endpoint for this Event Hubs namespace.
Go to your Event Hubs namespace in the Azure portal.
Select Networking under Settings in the left menu.
On the Networking page, select Manage under Public network access.
On the Public network access page, in the Default action section, select Enable from selected networks to allow access from only specified IP addresses.

Important
If you choose Selected networks, add at least one IP firewall rule or a virtual network that has access to the namespace. Choose Disabled if you want to restrict all traffic to this namespace over private endpoints only.
In the Virtual networks section of the page, select +Add a virtual network -> Add existing virtual network*. Select Add new virtual network if you want to create a new virtual network.
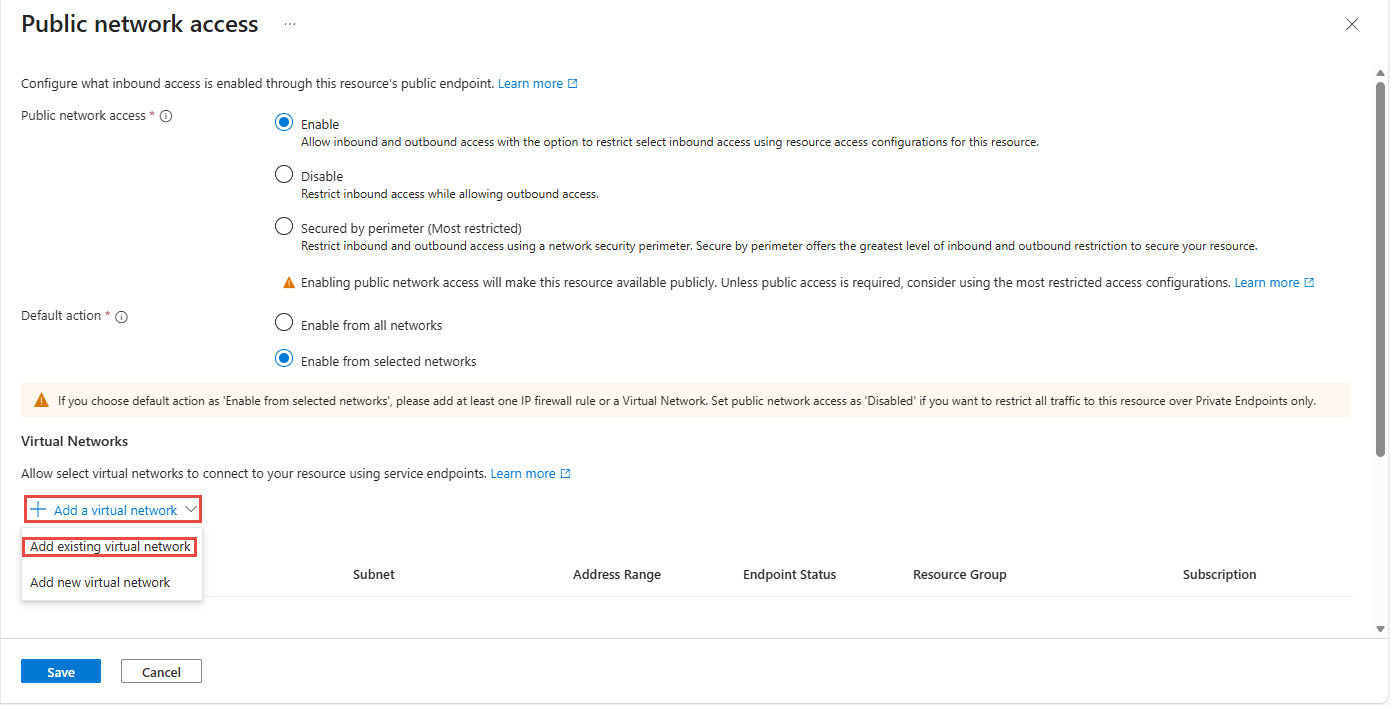
Important
If you choose Selected networks, add at least one IP firewall rule or a virtual network that can access your namespace. Choose Disabled if you want to restrict all traffic to this namespace over private endpoints only.
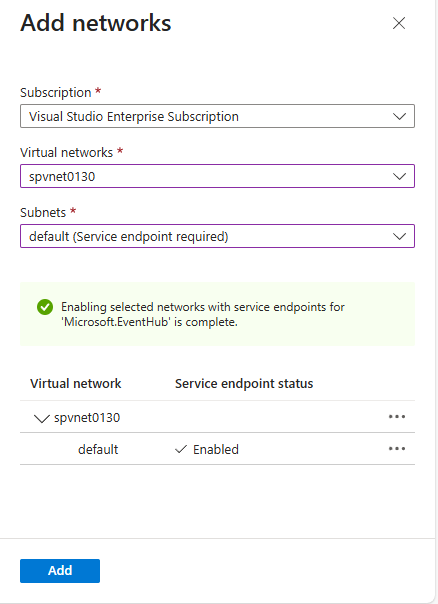
Select the virtual network from the list of virtual networks, select the subnet, and then select Enable. You must enable the service endpoint before adding the virtual network to the list. If the service endpoint isn't enabled, the portal prompts you to enable it.

You see a success message after enabling the service endpoint for the subnet for Microsoft.EventHub. Select Add at the bottom of the page to add the network.
Note
If you're unable to enable the service endpoint, you can ignore the missing virtual network service endpoint by using the Resource Manager template. This functionality isn't available on the portal.
In the Exception section, specify whether you want to allow trusted Microsoft services to access this resource. See Trusted Microsoft services for details.
Select Save on the toolbar to save the settings. Wait a few minutes for the confirmation to appear in the portal notifications.

Note
To restrict access to specific IP addresses or ranges, see Allow access from specific IP addresses or ranges.
Note
To delete a Virtual Network rule, first remove any Azure Resource Manager delete lock on the Virtual Network.


Trusted Microsoft services
When you enable the Allow trusted Microsoft services to bypass this firewall setting, the following services within the same tenant are granted access to your Event Hubs resources.
| Trusted service | Supported usage scenarios |
|---|---|
| Azure Event Grid | Allows Azure Event Grid to send events to event hubs in your Event Hubs namespace. You also need to do the following steps:
For more information, see Event delivery with a managed identity |
| Azure Stream Analytics | Allows an Azure Stream Analytics job to read data from (input) or write data to (output) event hubs in your Event Hubs namespace. Important: The Stream Analytics job should be configured to use a managed identity to access the event hub. For more information, see Use managed identities to access the event hub from an Azure Stream Analytics job (Preview). |
| Azure IoT Hub | Allows IoT Hub to send messages to event hubs in your Event Hubs namespace. You also need to do the following steps:
|
| Azure API Management | The API Management service allows you to send events to an event hub in your Event Hubs namespace.
|
| Azure Monitor (Diagnostic Settings and Action Groups) | Allows Azure Monitor to send diagnostic information and alert notifications to event hubs in your Event Hubs namespace. Azure Monitor can read from the event hub and also write data to the event hub. |
| Azure Synapse | Allows Azure Synapse to connect to the event hub using the Synapse Workspace Managed Identity. Add the Azure Event Hubs Data Sender, Receiver or Owner role to the identity on the Event Hubs namespace. |
| Azure Data Explorer | Allows Azure Data Explorer to receive events from the event hub using the Managed Identity of the cluster. You need to do the following steps:
|
| Azure IoT Central | Allows IoT Central to export data to event hubs in your Event Hubs namespace. You also need to do the following steps:
|
| Azure Health Data Services | Allows Healthcare APIs IoT connector to ingest medical device data from your Event Hubs namespace and persist data in your configured Fast Healthcare Interoperability Resources (FHIR®) service. The IoT connector should be configured to use a managed identity to access the event hub. For more information, see Get started with the IoT connector - Azure Healthcare APIs. |
| Azure Digital Twins | Allows Azure Digital Twins to egress data to event hubs in your Event Hubs namespace. You also need to do the following steps:
|
The other trusted services for Azure Event Hubs can be found below:
- Azure Arc
- Azure Kubernetes
- Azure Machine Learning
- Microsoft Purview
Use Resource Manager template
This sample Resource Manager template adds a virtual network rule to an existing Event Hubs namespace. It specifies the ID of a subnet in a virtual network for the network rule.
The ID is a fully qualified Resource Manager path for the virtual network subnet. For example: /subscriptions/{id}/resourceGroups/{rg}/providers/Microsoft.Network/virtualNetworks/{vnet}/subnets/default.
When adding virtual network or firewall rules, set the value of defaultAction to Deny.
{
    "$schema": "https://schema.management.azure.com/schemas/2015-01-01/deploymentTemplate.json#",
    "contentVersion": "1.0.0.0",
    "parameters": {
      "eventhubNamespaceName": {
        "type": "string",
        "metadata": {
          "description": "Name of the Event Hubs namespace"
        }
      },
      "virtualNetworkName": {
        "type": "string",
        "metadata": {
          "description": "Name of the Virtual Network Rule"
        }
      },
      "subnetName": {
        "type": "string",
        "metadata": {
          "description": "Name of the Virtual Network Sub Net"
        }
      },
      "location": {
        "type": "string",
        "metadata": {
          "description": "Location for Namespace"
        }
      }
    },
    "variables": {
      "namespaceNetworkRuleSetName": "[concat(parameters('eventhubNamespaceName'), concat('/', 'default'))]",
      "subNetId": "[resourceId('Microsoft.Network/virtualNetworks/subnets/', parameters('virtualNetworkName'), parameters('subnetName'))]"
    },
    "resources": [
      {
        "apiVersion": "2018-01-01-preview",
        "name": "[parameters('eventhubNamespaceName')]",
        "type": "Microsoft.EventHub/namespaces",
        "location": "[parameters('location')]",
        "sku": {
          "name": "Standard",
          "tier": "Standard"
        },
        "properties": { }
      },
      {
        "apiVersion": "2017-09-01",
        "name": "[parameters('virtualNetworkName')]",
        "location": "[parameters('location')]",
        "type": "Microsoft.Network/virtualNetworks",
        "properties": {
          "addressSpace": {
            "addressPrefixes": [
              "10.0.0.0/23"
            ]
          },
          "subnets": [
            {
              "name": "[parameters('subnetName')]",
              "properties": {
                "addressPrefix": "10.0.0.0/23",
                "serviceEndpoints": [
                  {
                    "service": "Microsoft.EventHub"
                  }
                ]
              }
            }
          ]
        }
      },
      {
        "apiVersion": "2018-01-01-preview",
        "name": "[variables('namespaceNetworkRuleSetName')]",
        "type": "Microsoft.EventHub/namespaces/networkruleset",
        "dependsOn": [
          "[concat('Microsoft.EventHub/namespaces/', parameters('eventhubNamespaceName'))]"
        ],
        "properties": {
          "publicNetworkAccess": "Enabled",
          "defaultAction": "Deny",
          "virtualNetworkRules":
          [
            {
              "subnet": {
                "id": "[variables('subNetId')]"
              },
              "ignoreMissingVnetServiceEndpoint": false
            }
          ],
          "ipRules":[],
          "trustedServiceAccessEnabled": false
        }
      }
    ],
    "outputs": { }
  }
To deploy the template, follow the instructions for Azure Resource Manager.
Important
If you don't specify any IP or virtual network rules, all traffic flows into the namespace even if you set the defaultAction to Deny. The namespace is accessible over the public internet (using the access key). To allow traffic only from the specified IP addresses or subnet of a virtual network, specify at least one IP rule or virtual network rule for the namespace.
Use Azure CLI
Use the az eventhubs namespace network-rule-set commands to manage virtual network rules for an Event Hubs namespace:
add- Add a virtual network rulelist- List all network rulesupdate- Update network rulesremove- Remove a virtual network rule
Use Azure PowerShell
Use the following Azure PowerShell commands to manage virtual network rules for an Event Hubs namespace:
| Command | Description |
|---|---|
Add-AzEventHubVirtualNetworkRule |
Add a virtual network rule |
New-AzEventHubVirtualNetworkRuleConfig |
Create a virtual network rule configuration (use with Set-AzEventHubNetworkRuleSet) |
Set-AzEventHubNetworkRuleSet |
Apply network rule configuration to a namespace |
Remove-AzEventHubVirtualNetworkRule |
Remove a virtual network rule |
Default action and public network access
REST API
The behavior of the defaultAction property varies by API version:
| API version | Default value | Behavior |
|---|---|---|
| 2021-01-01-preview and earlier | Deny |
The deny rule isn't enforced unless you configure IP filters or virtual network rules. Without rules, traffic is allowed. |
| 2021-06-01-preview and later | Allow |
The service enforces the configured action. Set to Deny to block traffic not matching your rules. |
API version 2021-06-01-preview also introduces the publicNetworkAccess property:
Enabled- Allow operations over the public internetDisabled- Restrict operations to private links only
The service remembers your rules when you disable and re-enable them.
For more information, see Create or Update Network Rule Set and Create or Update Private Endpoint Connections.
Note
Network settings don't bypass authentication. The service always validates SAS or Microsoft Entra authentication claims after checking the network rules configured by defaultAction, publicNetworkAccess, and privateEndpointConnections.
Azure portal
The Azure portal always uses the latest API version to get and set properties. If you previously configured your namespace by using 2021-01-01-preview and earlier versions with defaultAction set to Deny, and you specified zero IP filters and virtual network rules, the portal previously checked Selected Networks on the Networking page of your namespace. Now, it checks the All networks option.
